Alright, this is it. This weekend it’s really happening! No, you are not starting that new fad diet that you saw on TikTok: This is the weekend that you use DuraDecor’s easy-to-install, fresh vinyl looks to complete your first DIY installation and give your place the makeover you’ve been dreaming about.
You have done your research, picked out your favorite style, and you even have a dinner party scheduled at the end of the month to show off your design refresh. It’s time to make it happen. Thankfully, DuraDecor collections are designed and engineered to provide the highest-quality DIY vinyl products so that you can craft fun, original spaces with and install them yourself with confidence.
For instance, the Polished Pro Collection offers three installation specifications to select from—2.0 mm glue down, 2.5 mm glue down, or 5.0 mm ‘click and lock’ floating floor with foam underlayment— so that you can match your flooring installation system with your level of DIY experience. With a floating floor installation, you can often avoid the very un-fun task of ripping up and disposing of old flooring, as well as messy glues and adhesives!
When you’re ready to start your DuraDecor DIY flooring installation, make sure to visit our How to DIY DuraDecor Rigid Core Flooring post as well as valuable online resources.
Now that you’re informed and motivated, let’s go over the big No-Nos during your project. To ensure the best results possible for your gorgeous new floor, review these common mistakes to avoid when installing rigid core flooring:
- Not Buying Enough Flooring: There’s nothing worse than starting an installation and running out of your DuraDecor style before the floor is complete. That’s like running out of your favorite dipping sauce with a full box of chicken nuggets left! Before you begin your project, here’s a great way to estimate how much new flooring you’ll need to finish your room:
First, measure the room’s length and width. If your room isn’t a nice, neat square or rectangle, factor any alcoves, adjoining closets, or jut-outs by dividing the room into separate areas and measuring each one individually. Then, multiply the length by the width to get the square footage area of each sub-divided section. Add the different sections up for the total square footage of the room. So far, so good?
Now that you have the total area, multiply that number by 1.10 (about 10% more) to account for some waste and extra flooring for cuts. If your total area is 100 sq. ft., multiply that by 1.10 to equal 110 sq. ft. of flooring needed for installation. Math skills, Check!
For larger open areas without many cuts, you may only need 5% more. In that case, you would multiply your total area by 1.05, and round up to the next full box. Remember, having some extra flooring is never a bad thing.
- Skipping The Instructions: Whatever you do, please read the instructions and the warranty before you begin installation! If you can’t locate a paper copy, visit the DuraDecor website and download a copy. This might seem obvious, but it is oh-so-important to maintain your product warranty.
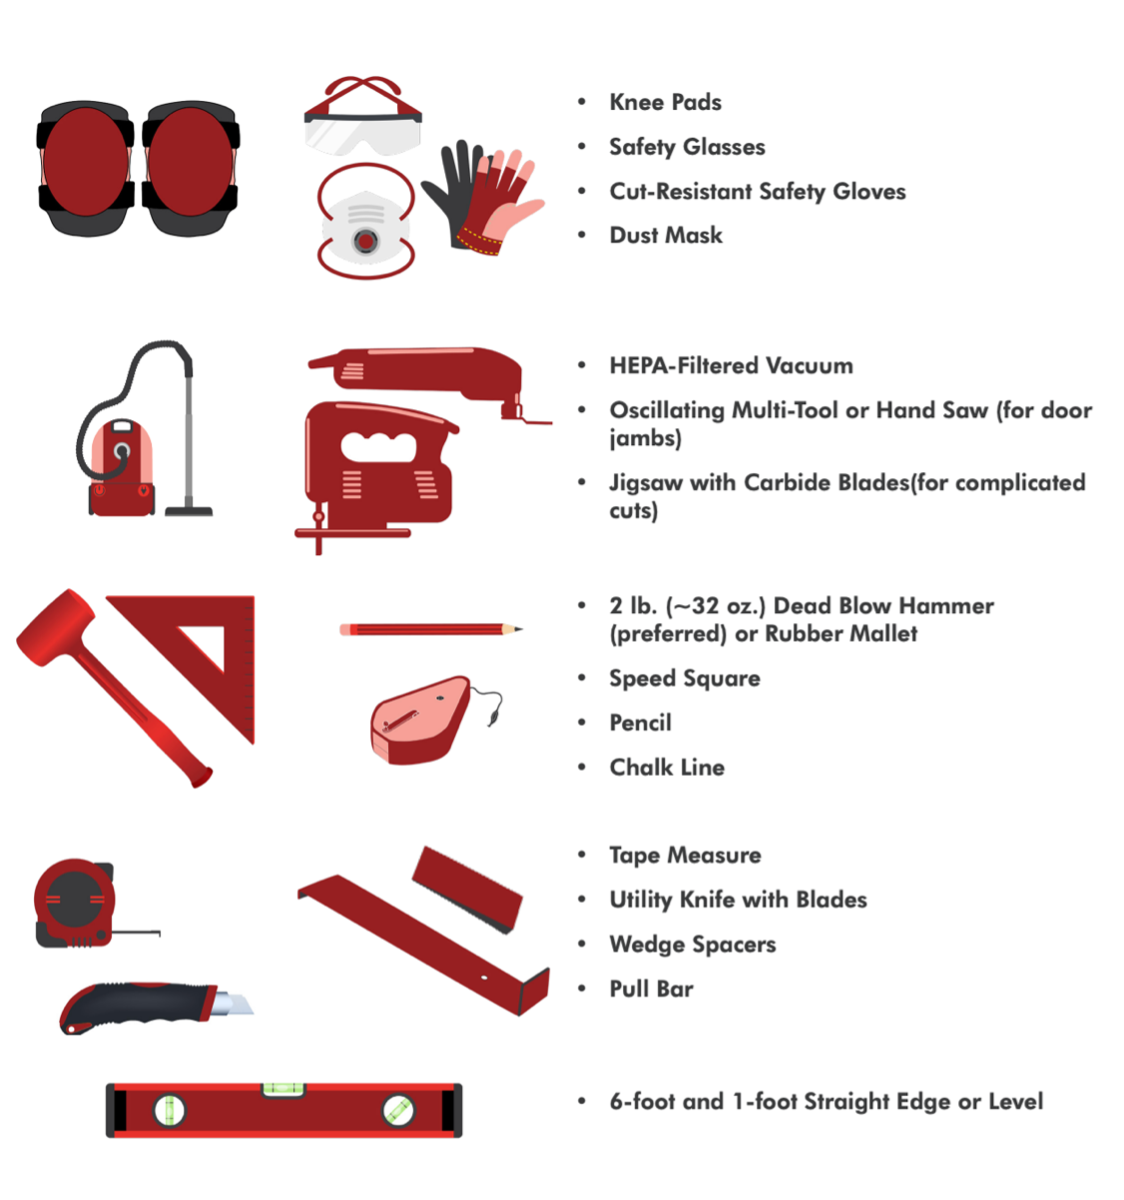
- Using Incorrect Tools: Always use the correct tools for the job. Your flooring installation does not need many tools but using the incorrect ones may cause damage to your floor. A full list is included within the installation instructions that you just made sure to read and download. Plus, you can find them linked on our YouTube channel, too.
- Not Measuring an Expansion Gap: Vinyl flooring can experience expansion and contraction with normal temperature changes. To factor this in, what’s called an “expansion gap” is needed around the entire perimeter of your new floor or anywhere it meets another floor or vertical surface (including walls, cabinets, stairs, etc.).
- Expansion gaps can relieve the pressure from heat expansion that can affect a floating floor and prevent any noticeable buckling or peaked appearance, which is never cute.
-
- If the floor is less than 50 ft in length or width, leave at least a ¼-inch expansion gap around the entire perimeter.
- If the floor is between 50–85-ft, increase the expansion gap to ½-inch around the entire perimeter.
-
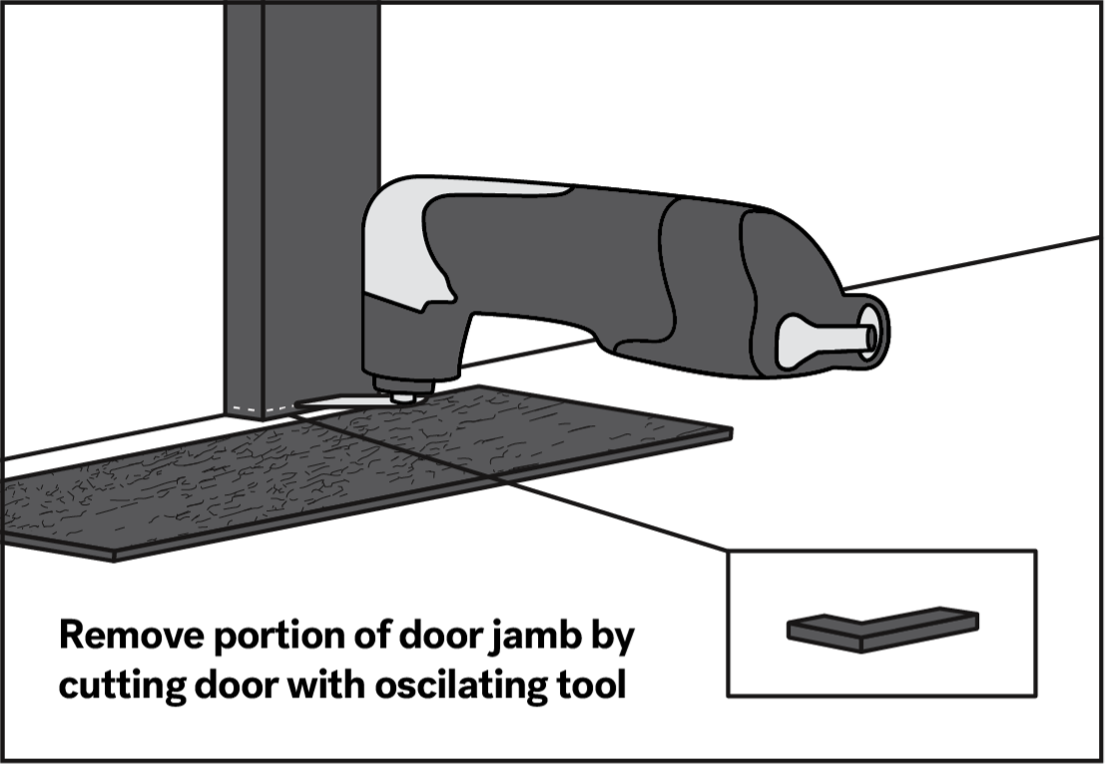
- Not Undercutting Door Jambs: Undercut all door jambs. This step is very easy to overlook, but it allows your new flooring to be installed underneath them with the required expansion gap. Doing this step ahead of installation, saves headaches after the finished floor is complete and you’re ready to be done!
- Installing Over an Unlevel Surface: Make sure that your subfloor is acceptable ahead of time, and you can do so by using a six-foot level everywhere that’s of concern. If you can slide two stacked US quarters underneath, then you will need to make corrections to the substrate using a floor patch before installation. See the installation instructions for all the details on this.
- Not Using a Moisture Barrier Over Concrete: We love waterproof floors, but high alkalinity from ground-sourced moisture can still cause problems and trap water from the concrete underneath your flooring. What that means is, all on-grade and below-grade concrete subfloors need a 6mil polyethylene vapor retarder or barrier installed underneath the new floor. Take care of this step and you’ll feel even better hosting your watch-parties!
- Not Creating a Random Pattern: You want your finished floor to look amazing, right? Then it’s time to be random! Before beginning, check and make sure the lot numbers on the DuraDecor packaging match. Next, mix the planks from several boxes to ensure a random appearance that avoids pattern and sheen repeats. The end joint layout for all planks should also be random to ensure that joints are not “stair-stepped.” If you don’t randomize your planks, the overall look will appear stunted. If you don’t randomize the end joints, the integrity of the finished floor joint system can become compromised.
- Damaging the Locking System: Be careful when you handle your DuraDecor planks to avoid damaging the locking mechanism before using it. Do not stand boxes on end or drop them, and carefully lay them flat on the substrate. Treat your boxes like you want your Amazon packages delivered. 😉
During installation, inspect your DuraDecor for any damage, dirt, or debris in the locking mechanism (remove using a soft brush). Do not hit the locking mechanism directly with any hammer, tapping block, or pull bar (except the last row) to avoid damaging the locking mechanism, peaking, gapping, or broken joints.
- Gluing-Down A Floating Floor: DuraDecor floating floors are designed to be locked together to make a secure connection and freely move in the room as a whole. Floating floors should never be glued down or nailed to the subfloor.
- Adding an Underlayment: Since DuraDecor floating floor options already feature a pre-attached backing that has been developed for maximum effectiveness for both acoustic performance and the life of the flooring, adding another underlayment isn’t necessary. If you think that you are adding more sound insulation, independent testing shows that only one point improvement would be expected. Also, adding more underlayment increases the stress on the locking mechanism and may shorten the life of the flooring. Save your money and don’t double up.
- Adding An After-Market Finish: There’s no need to apply an after-market finish. Once you start using a finish, this will need to become a part of your regular maintenance routine. Who wants to create more work? If you do decide to use a finish, it must be created for solid vinyl flooring, be pH neutral, and should be a matte finish. Keep it easy for yourself: Proper care and maintenance without using a finish is always the recommended approach.
There you have it, the common DIY installation mistakes that you will NOT make during your project. It’s time to bring innovation and style to your place and create a space that’s all your own. Make sure to follow DuraDecor by Novalis Innovative Flooring on YouTube, Pinterest, and Facebook for plenty of helpful installation tips and amazing room inspiration to spark your creativity!
*Important Note: These tips are meant to supplement our official instructions, not replace them. Please carefully review the technical installation instructions for your DuraDecor products to maintain your product warranty.